Top 20 ChatGPT Photo Editing Prompts with Examples
Let me be honest with you, I spent years fumbling through Lightroom tutorials, watching the same YouTube videos three times because I kept missing a step. The problem wasn’t the software. It was that nobody was giving me specific, actionable answers to my specific situations. My photo had harsh shadows under the eyes, not “harsh lighting in general.” My sky was blown out in a RAW file, not “overexposed somewhere.”
That’s exactly where ChatGPT changed things for me. Not because it replaces skill, it doesn’t, but because it finally let me ask precisely what I needed and get a real answer back. Think of it as having a senior retoucher in your pocket, one you can pepper with dumb questions at 2am without judgment.
These 20 prompts are ones I’ve personally tested and refined. I’ll show you the exact wording, what kind of output to expect, and a few hard-won tips along the way. Whether you shoot portraits, landscapes, or product shots, there’s something here that’ll save you time this week.
Table of Contents
PORTRAITS & PEOPLE
1. Natural Background Replacement for Portraits
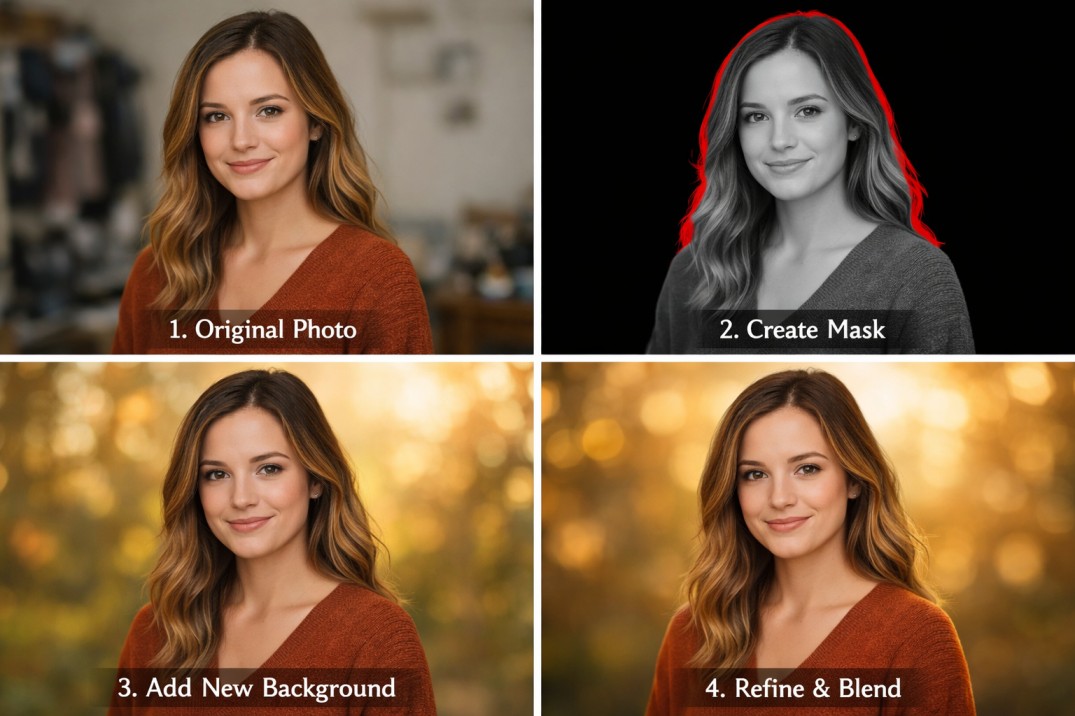
Swapping a messy background sounds simple until you’re fighting selection edges around flyaway hair and the new sky looks like it was pasted on with a glue stick. Getting the masking and light blending right is where most people give up. This prompt walks you through it properly.
PROMPT:
I have a portrait photo taken indoors against a messy background. I want to replace it with a soft, blurred outdoor bokeh background in warm golden-hour tones. Provide a step-by-step workflow using Adobe Photoshop, including masking and blending techniques to make it look natural.
WHAT CHATGPT RETURNS:
A detailed workflow covering Select Subject, the Select & Mask workspace for refining hair edges, placing the bokeh background behind the subject, and matching the subject’s color temperature to the background. It typically suggests boosting the subject’s orange tones by +8–10 to sell the golden-hour illusion.
Pro Tip: Name your software in every prompt — Photoshop, Lightroom, GIMP, Canva. The advice changes significantly depending on which tools you actually have.
2. Natural Skin Retouching Without Overdoing It
There’s a version of skin retouching that makes people look like they are made of wax. You have seen it. The goal here is the opposite, smooth but real, with pores still visible. Frequency separation is the pro technique for this, and it sounds scarier than it is.
PROMPT
I want to retouch a portrait to reduce blemishes and even out skin tone while keeping natural skin texture intact. The subject is a 35-year-old woman photographed in natural light. Walk me through frequency separation technique in Photoshop.
WHAT CHATGPT RETURNS
Step-by-step frequency separation: duplicate your layer twice, apply a Gaussian blur (4–6px) to the lower copy for color/tone correction, keep the upper copy untouched for texture. Heal blemishes only on the blurred (low-frequency) layer. The texture layer stays crisp and untouched throughout, giving that editorial-but-real look.
3. Cinematic Color Grading for Portraits
Teal and orange grading is one of those looks that’s become almost synonymous with “professional” in photography circles, partly because it is genuinely flattering, and partly because it is all over Hollywood. Getting the ratios right is the tricky part. Too much and it looks garish.
PROMPT
I want to apply a cinematic teal and orange color grade to a portrait photo in Lightroom. The image was shot in bright daylight. Give me exact slider values for HSL, Tone Curve, and Color Calibration panels to achieve a Hollywood-style look.
WHAT CHATGPT RETURNS
Specific values you can dial in immediately: Orange Hue +8, Saturation -12; Blue channel pulled up in the shadows of the Tone Curve; Red Primary Hue +15 in Color Calibration; Blue Primary Saturation +20. Plus a vignette recommendation around -25 for added drama.
Pro Tip: Try asking it to mimic a specific film director’s aesthetic — Wes Anderson’s palette, Denis Villeneuve’s cold tones, or even a specific movie like Blade Runner 2049.
4. Remove Unwanted Objects from Photos
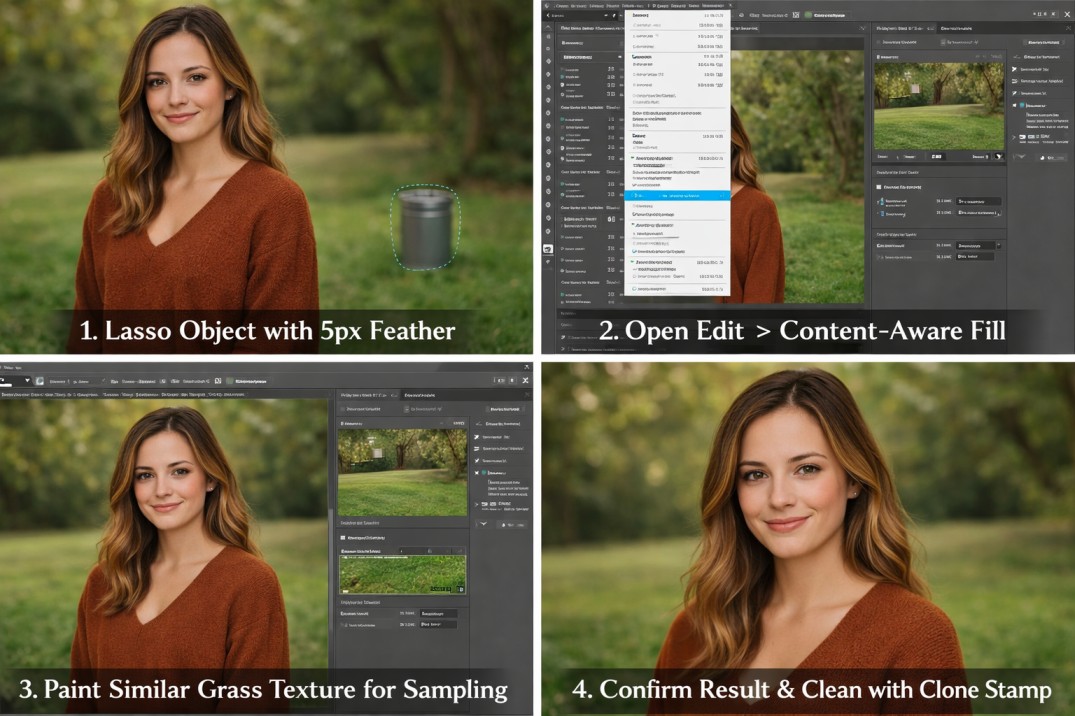
Every photographer has that otherwise perfect shot with a trash can, power line, or stranger’s elbow creeping into the frame. Content-aware fill has gotten remarkably good, but you still need to approach it correctly or you end up with smeared, artifact-ridden patches.
PROMPT
There is a trash can visible in the bottom-right corner of my outdoor portrait. The background behind it is a grass lawn with trees. How do I remove it cleanly using Photoshop’s Content-Aware Fill without leaving artifacts?
WHAT CHATGPT RETURNS
Lasso the object with a 5px feather, open Edit > Content-Aware Fill, switch sampling to Custom mode and paint around similar grass texture for better source material. Use Clone Stamp at low opacity (15–20%) for any leftover seams. The Patch Tool is also suggested as a quicker alternative for simpler backgrounds.
5. Fix Harsh Lighting and Add Studio Glow
Midday sun is basically the worst light for portraits – raccoon eyes, flattened features, unflattering shadows. But you can recreate much better lighting in post if you know how to dodge and burn properly. Most people do it too aggressively; the key is subtlety.
PROMPT
My portrait has harsh shadows under the eyes and nose from midday sunlight. I want to soften them and add a flattering “butterfly lighting” effect in post-processing. Provide a dodge-and-burn workflow in Photoshop with specific brush settings.
WHAT CHATGPT RETURNS
Create a Curves adjustment layer set to Luminosity blend mode as a non-destructive dodge layer. Use a 200px soft brush at 10% exposure to lift under-eye shadow areas. For burn, a separate layer at 8% works the overlit forehead and cheekbones. A gentle radial gradient lifting midtones on the face completes the butterfly look.
LANDSCAPES & NATURE
6. Vintage Film Look for Landscapes
Kodak Portra 400 has this quality that is hard to describe – warm midtones, shadows that are not quite black, greens that lean slightly yellow. It looks like a memory. People spend years trying to replicate it digitally, but it actually comes down to a handful of specific adjustments.
PROMPT
I want to make my landscape photo look like it was shot on Kodak Portra 400 film — warm midtones, lifted shadows, subtle grain, and slightly desaturated greens. Give me exact Lightroom settings and how to add authentic film grain.
WHAT CHATGPT RETURNS
Shadows +25, Blacks +15 to lift the shadow floor. Vibrance -10, Green Saturation -20, Orange Hue +8 for the characteristic color shift. Grain at Amount 30 / Size 35 / Roughness 50. The Tone Curve fade is explained in detail: lift the bottom-left anchor point to simulate the raised blacks of film stock.
7. Sky Replacement with Realistic Blending
Photoshop’s Sky Replacement tool is impressive until it isn’t, and it breaks on anything with complex edges like trees or structures. Knowing when to use the auto tool versus masking manually is half the battle. The other half is making the foreground lighting match your new sky.
PROMPT
I photographed a landscape at dusk but the sky is overexposed and washed out. I want to replace it with a dramatic purple and pink sunset sky from another photo. How do I blend the two images so the horizon line and lighting on the foreground look realistic in Photoshop?
WHAT CHATGPT RETURNS
Two approaches: Sky Replacement (Edit menu, Photoshop 2021+) for quick results, or manual luminosity masking for complex treelines. The manual approach covers sampling the replacement sky’s purple onto foreground highlights using Color Match, and a Gradient Map at 5% opacity to unify warm tones across the entire image.
8. HDR Merge and Tone Mapping That Doesn’t Look Fake
HDR photography went through a phase in the mid-2000s where everything looked hyper-saturated and almost radioactive. Nobody wants that anymore. The modern approach is natural, just well-exposed across the full tonal range, with proper shadow and highlight detail that a single frame can’t capture.
PROMPT
I have 3 bracketed exposures of a mountain landscape: -2 EV, 0 EV, and +2 EV. Walk me through merging them into a natural-looking HDR image in Lightroom Classic, and then how to tone-map it so it doesn’t look over-processed.
WHAT CHATGPT RETURNS
Photo Merge > HDR with Deghost set to Medium for moving elements. After the merge: Highlights -80, Shadows +60, Clarity +15, Dehaze +10. Explicit warning against heavy Saturation — keep Vibrance under +20. The end result should look like a well-exposed single frame, not like a video game cutscene.
9. Night Photo Enhancement and Noise Reduction
Astrophotography is one of those specialties where getting the base exposure right is only half the work, the editing is the other half. High ISOs introduce color noise that needs careful treatment, and getting the Milky Way to actually pop without the sky looking plastic is genuinely tricky.
PROMPT
I shot a Milky Way photo at ISO 6400, f/2.8, 20 seconds. The image is very noisy and has a greenish color cast. How do I denoise it, correct the color, and make the stars pop in Lightroom using AI Denoise and manual adjustments?
WHAT CHATGPT RETURNS
Run AI Denoise (Photo > Enhance > Denoise) at strength 50 before doing anything else. Then: White Balance to approximately 3900K and Tint -5 to pull out the green cast. A radial filter over the sky with Clarity +20 and Texture +15 pulls out star definition. A -40 vignette focuses the eye on the Milky Way core.
PRODUCT & COMMERCIAL PHOTOGRAPHY
10. Clean Product Photo on Pure White Background
Amazon, Shopify, and most e-commerce platforms have strict requirements for product images, and “nearly white” doesn’t pass. Getting that true #FFFFFF background with a believable drop shadow or reflection takes more precision than people expect the first time they try it.
PROMPT
I photographed a perfume bottle on a light grey background. I need to: isolate the product, place it on a pure white background (#FFFFFF), add a subtle reflection below it, and ensure the image is 2000x2000px at 72 DPI. Give me the complete Photoshop workflow.
WHAT CHATGPT RETURNS
Pen Tool for clean masking, white background layer, reflected copy below (flipped, Gaussian blur 8px, 25% opacity). The key technical step: use Curves to verify corner areas hit R:255 G:255 B:255 exactly. Image Size set to 2000×2000 using Bicubic Sharper for downsampling. Ready for any marketplace upload.
Pro Tip: Tell ChatGPT which marketplace you’re shooting for — Amazon, Etsy, Shopify. It’ll tailor the file specs and image requirements to that platform’s exact guidelines.
11. Add Lifestyle Context to Product Photos
A mug on white is a product shot. A mug on a warm kitchen counter with steam rising and soft morning light — that’s a reason to buy. Compositing a clean packshot into a lifestyle scene dramatically changes how people respond to it, and it doesn’t require a full reshooting day.
PROMPT
I have a clean packshot of a coffee mug on white. I want to place it in a cozy morning kitchen scene with warm light coming from a window. How do I add realistic shadows, match the lighting direction, and blend it naturally in Photoshop?
WHAT CHATGPT RETURNS
Source or generate a matching kitchen background, place the mug, add a drop shadow (Angle 135 degrees, Distance 20, Softness 25). Create a cast shadow using a dark ellipse on a Multiply layer below the mug. Shift the mug’s Color Balance toward warm yellow to match the window light. The result: a convincing scene without a studio setup.
CREATIVE & SPECIAL EFFECTS
12. Convert to Dramatic Black and White
Bad black and white conversion is just desaturation with a shrug. Good black and white is about sculpting contrast, making the shadows mean something, the highlights sing. The photographers whose B&W work stops you in a scroll understood this. You have to think in tones, not colors.
PROMPT
I want to convert a street photography portrait to black and white with high contrast, punchy shadows, and a slightly gritty feel reminiscent of classic Magnum Photos. Give me a Lightroom and Silver Efex Pro 2 workflow with specific settings.
WHAT CHATGPT RETURNS
In Lightroom’s B&W mixer: pull Green and Yellow down to darken skin tones, lower Blue to deepen skies. In Silver Efex Pro 2: Full Contrast preset as the base, Kodak Tri-X 400 film emulation, Structure +20, Fine Structure +15. The grit comes from the grain characteristics of that particular film profile — exactly the Magnum look.
13. Create a Tilt-Shift Miniature Effect
The tilt-shift effect works on a surprisingly simple principle: our brains associate shallow depth of field with macro photography of small objects. Blur the top and bottom of an aerial or elevated shot, punch up the saturation slightly, and suddenly a real city looks like a scale model. It is a fun trick that always gets a reaction.
PROMPT
I have an aerial photo of a busy city intersection taken from a rooftop. I want to apply a tilt-shift miniature effect to make it look like a toy model. Walk me through the blur gradients and color adjustments needed in Photoshop to make it convincing.
WHAT CHATGPT RETURNS
Field Blur > Tilt-Shift with the sharp band centered on the main subject, blur pushed to 25–40px at the edges. Then Vibrance +30, Saturation +15, and a Curves boost to increase contrast — mimicking the oversaturated, punchy colors associated with miniature model photography. The contrast step is what actually sells it.
14. Double Exposure Portrait Effect
Double exposure has been done in-camera since the film era, but Photoshop gives you full control over which elements combine and how. The silhouette-with-landscape version is the classic, a person’s profile filled with forest, mountains, or architecture. It is one of those techniques that still looks genuinely striking when done well.
PROMPT
I want to create a double exposure effect combining a side-profile portrait of a woman with a forest scene, so the trees appear to grow from within her silhouette. Give me the full blend mode and masking technique in Photoshop.
WHAT CHATGPT RETURNS
Extract the silhouette using Select Subject, fill it black on a new layer. Paste the forest image above, create a Clipping Mask to contain it within the silhouette. Set the forest layer to Screen mode at 85% opacity. Finish with a desaturation layer and selective color adjustments to unify the tones into a single cohesive palette.
15. Neon Glow and Cyberpunk Color Effect
The cyberpunk aesthetic, neon pinks, electric blues, deep shadow is everywhere in music photography, gaming content, and fashion editorial right now. It’s a look that photographs best in urban environments at night, but you can push any portrait toward it with the right layering technique in Photoshop.
PROMPT
I want to give my urban night portrait a cyberpunk aesthetic with neon pink and electric blue color split, glowing edges, and a moody dark background. Provide exact steps in Photoshop including how to create the neon glow effect on the subject.
WHAT CHATGPT RETURNS
Selective Color to push shadows deep purple-black. Outer Glow layer effect in #FF00CC (neon pink) at 20% spread, then a second glow layer in #00EEFF (electric blue). Chromatic aberration via Filter > Distort > Lens Correction with a +3/-3 offset creates the color fringe on edges. The combination of these three layers produces a convincing neon-lit scene.
RESTORATION & CORRECTION
16. Restore and Colorize Old Family Photos
This is the one that genuinely moves people. I have helped a few relatives restore old photos of grandparents who passed away years ago, getting a cracked, faded print back to something vivid and alive is a meaningful thing to do. The combination of AI repair tools and careful manual colorization has made this more accessible than ever.
PROMPT
I have a 1940s black and white family photo with faded areas, scratches, and a torn corner. I want to: (1) repair the damage, (2) sharpen the image, and (3) add realistic colorization. What tools and workflow should I use, including any AI tools?
WHAT CHATGPT RETURNS
Three-stage workflow: repair scratches with Photoshop’s Neural Filters > Photo Restoration (or Healing Brush for detailed control); upscale with Topaz Gigapixel AI to recover detail; colorize using DeOldify or Palette.fm. It also covers manual colorization using Hue/Saturation layers with clipping masks for skin, clothing, and sky separately.
Pro Tip: Ask a follow-up: ‘What colors were typical in 1940s American family clothing?’ ChatGPT gives you era-accurate color palettes to make the colorization historically believable, not just plausible.
17. Recover Blown-Out Highlights in Wedding Photos
A bride’s white dress in bright sunlight is basically every wedding photographer’s nightmare in terms of exposure. The good news is that RAW files carry a surprising amount of recoverable detail, usually two to three stops worth. The challenge is bringing it back without making the dress look grey or flat.
PROMPT
My wedding photo has blown-out highlights on the bride’s white dress. The file is a RAW (.CR3) file. How much can I realistically recover, and what’s the best technique in Lightroom Classic and Photoshop to restore detail and natural tones without making it look grey?
WHAT CHATGPT RETURNS
Realistic recovery expectation: 2–3 stops from a properly exposed RAW file. In Lightroom: Highlights -100, Whites -60 as the first step. For stubborn areas, the advice moves to Photoshop — a Luminosity Mask targeting the top 25% of brightness, applying a Curves reduction only to those tones. The green channel typically holds the most fabric texture for white garments.
18. Correct Lens Distortion and Perspective in Architecture
Wide-angle real estate photography is one of those genres where getting the geometry wrong immediately makes a listing look unprofessional. Vertical lines that converge, barrel distortion making walls bulge, they are fixable, but you need to go in the right order and know which tool to reach for first.
PROMPT
I shot a real estate interior with a 16mm lens and the vertical lines are converging (keystoning). The room also has barrel distortion. Give me the exact Lightroom Transform panel settings and how to use Guided Upright to correct both issues without cropping too much of the frame.
WHAT CHATGPT RETURNS
First: enable Profile Corrections to handle the barrel distortion automatically via lens metadata. Then use Guided Upright — draw two vertical lines on door frames and two horizontal lines along the floor/ceiling junction. Fine-tune with the Vertical slider (+5–10) if lines still converge slightly. Enable Constrain Crop to auto-trim without losing significant frame. Result: geometrically correct room with minimal crop loss.
ADVANCED & WORKFLOW PROMPTS
19. Ask ChatGPT to Critique Your Existing Workflow
One of the most underused applications of ChatGPT for photographers is handing over your current workflow and asking what you’re doing wrong. It is the equivalent of a senior retoucher reviewing your process, and unlike your colleagues, it won’t be polite about mediocre choices.
PROMPT
Here is my current portrait editing workflow in Lightroom: (1) Set white balance to Kelvin 5500, (2) Exposure +0.3, (3) Clarity +20, (4) Vibrance +15, (5) Sharpen 70/1.0/50, (6) Noise Reduction 30. Critique this workflow and tell me what I am doing wrong and how to improve it for professional portraits.
WHAT CHATGPT RETURNS
Common flags: Clarity +20 is too high for portraits — it makes skin look rough and textured. Recommendation is 0–8 for faces. Noise Reduction should happen before sharpening, not after. Texture is generally more appropriate than Clarity for skin. Vibrance at +15 can over-saturate lips and reds — +10 is the suggested ceiling. These are the kinds of notes a working retoucher would give you.
20. Build a Batch Editing Preset System for Weddings
Wedding photographers deal with a specific problem: 600 to 800 images across wildly different lighting conditions, outdoor golden hour, dark churches, dim reception halls, all of which need to feel like a cohesive set. Building a smart preset structure upfront is the difference between a 3-hour cull and a 12-hour slog.
PROMPT
I photograph weddings and typically shoot 600-800 images per event. I use Lightroom Classic. Design a preset system with 5 base presets for: (1) outdoor golden hour, (2) indoor reception, (3) dark church/ceremony, (4) black and white, and (5) detail shots. Include the key settings for each preset.
WHAT CHATGPT RETURNS
Full preset matrix with specific values. Example for Outdoor Golden Hour: WB 5800K, Highlights -50, Shadows +30, Orange Hue +8, Vibrance +12, Grain 15. Indoor Reception: Auto WB, Noise Reduction 45, Shadows +40, Clarity +5. Dark Church: Shadows +60, Highlights -60, Exposure +0.5, HSL Saturation -15 across all colors. Each preset comes with a sync strategy for batch application and notes on what to adjust per image after syncing.
Pro Tip: Follow up with: ‘Now write a culling strategy for deciding which 150 images to edit first from a 700-image wedding gallery.’ The workflow advice gets even more specific.
One Last Thing Before You Start
The photographers who get the most out of ChatGPT are the ones who treat it like a conversation, not a search engine. Start with one of these prompts, follow it, and when something doesn’t look right, ask why.
“Why did you recommend Gaussian blur at 4–6px and not higher?” or “What happens if I apply the Clarity adjustment to the whole image instead of just the sky?”
That is when it gets genuinely useful. The prompt gets you started; the follow-up questions get you to understand. And once you understand the reasoning behind a technique, you will adjust it confidently for photos that don’t quite match anyone else’s scenario, because your photos never do.
Pick one from this list. Run with it. Come back when you are ready for the next one.
Quick Reference: All 20 Prompts
Here is every prompt at a glance, the topic, category, and which tool it works best with.
| Num | Prompt Topic | Category | Best Tool | Difficulty |
| 01 | Background Replacement | Portrait | Photoshop | Medium |
| 02 | Skin Retouching | Portrait | Photoshop | Advanced |
| 03 | Cinematic Color Grade | Creative | Lightroom | Easy |
| 04 | Remove Objects | Portrait | Photoshop | Medium |
| 05 | Fix Harsh Lighting | Portrait | Photoshop | Medium |
| 06 | Vintage Film Look | Landscape | Lightroom | Easy |
| 07 | Sky Replacement | Landscape | Photoshop | Medium |
| 08 | HDR Merge | Landscape | Lightroom | Medium |
| 09 | Night + Noise Reduction | Landscape | Lightroom | Advanced |
| 10 | Product White Background | Product | Photoshop | Medium |
| 11 | Lifestyle Composite | Product | Photoshop | Advanced |
| 12 | Black and White | Creative | Silver Efex / LR | Easy |
| 13 | Tilt-Shift Effect | Creative | Photoshop | Easy |
| 14 | Double Exposure | Creative | Photoshop | Advanced |
| 15 | Neon Glow / Cyberpunk | Creative | Photoshop | Medium |
| 16 | Photo Restoration | Restoration | PS + AI Tools | Advanced |
| 17 | Blown Highlight Recovery | Restoration | LR + Photoshop | Medium |
| 18 | Distortion Correction | Restoration | Lightroom | Easy |
| 19 | Workflow Critique | Advanced | ChatGPT Only | Easy |
| 20 | Batch Preset System | Advanced | Lightroom | Easy |
Note: I created two example images and added them to this blog post to demonstrate how changes to the images will reflect in your images. You create your own using above listed prompts based on your category.